Enable dynamic host pool Auto-scaling
The auto-scale feature ensures that only the number of session host VMs required to serve the current demand are running. When not in use, VMs are stopped or deleted. When demand rises, or at specific times of the day, additional VMs in the host pool are started or created. This allows for cost savings.
You can enable and configure the auto-scaling feature for dynamic host pools.
Note: By default, the Auto-scale option is disabled. When you enable auto-scaling, you can configure the desktop image, VM size, and OS disk template, and also set the criteria for host pool sizing, scaling logic, and pre-stage hosts.
To enable dynamic host pool auto-scaling:
-
Locate the dynamic host pool you wish to work with.
-
From the more options
 menu, hover over Auto-scale , and select Configure.
 -
Enter the following basic auto-scale information:
-
Auto-Scale: Toggle this option to Enabled.

-
Auto-scale Timezone: From the drop-down list, select the time zone for the auto-scale process.
- Name: Type the name of the newly added hosts for Prefix or the Prefix+Pattern.
Prefix/Pattern: From the drop-down list, select whether to use a Prefix or a Pattern.
Note:
Prefix can be used when creating multiple session hosts. The Prefix limit is 10 valid, Windows computer name characters. When using a Prefix, a unique suffix is automatically appended in the format "-xxxx", where xxxx are 4 random alphanumeric characters. For example: AVDHOST-s72h. Do not add a "-" to the Prefix.
Pattern can be used to specify an advanced naming convention for new hosts. Pattern characters must be enclosed in {} and can be # (for sequential numbers) and/or ? (for random alphanumeric characters). One # implies numbers from 0 to 9, two #s implies numbers of 0 to 99, etc.
Example 1: AVDHOST{###} (AVDHOST000..AVDHOST999).
Example 2: AVDHOST-{???} (AVDHOST-d83, AVDHOST-7sl, etc.).
-
Network: From the drop-down list, select the network the VM connects to.
Note: The VM that is created on the selected network is created in the Azure region associated with the network.
-
Additional subnets: From the drop-down list, select additional subnets within the same virtual network.
Note: If a particular subnet does not have enough IP addresses when scaling out,then the next subnet will be chosen automatically when creating additional session hosts.
-
Network distribution: From the drop-down list, select how the load is distributed across the network.
Note: Select Depth first to distribute the load to nodes one after another in a fixed order, or, for optimal distribution, select Breadth first to balance the load proportionally based on current resource usage.
-
Desktop Image (template): From the drop-down list, select a desktop image to be used as the golden image for new session hosts.
-
VM Size (template): From the drop-down list, select the VM size for new session hosts.
-
Running OS Disk (template): From the drop-down list, select the OS disk type and size for new session hosts.
-
Stopped OS disk type: From the drop-down list, select the OS disk type when session host VMs are stopped.
Note: See Auto-Scale Cost Optimization OS Disk Storage for more information about OS disk auto-scale configuration.
-
Resource Group: From the drop-down list, select the resource group where VMs should be created.
-
VM Naming: From the drop-down list, select the VM naming to use.
Note: Host VMs that are created automatically by the scale out or auto-grow process use names based on the selected VM naming mode. See How Session Host VM Names are Generated for more information.
-
Re-use names: Always attempt to re-use names that were previously used in the pool, if available.
-
Standard names: Use the next available name.
-
Unique names: Always attempt to use a unique name for new hosts.
-
-
Automatically Re-image Used Hosts: Selecting this option to re-image hosts that had at least one user logged into them. For multi-session hosts, the hosts are re-imaged once the last user signs out.
-
Scaling interval: From the drop-down list, select the time interval.
-
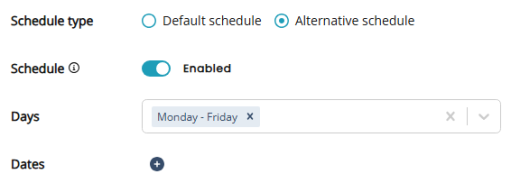
Schedule type: Select the Default schedule or Alternative schedule.
-
Select the Default schedule or Alternative schedule.
Note: Nerdio Manager allows you to configure separate auto-scale settings for a default schedule (normal operations) and an alternative schedule (outside of normal operations). For example, you may want fewer session hosts available on weekends or bank holidays. Alternatively, you may want more session hosts available two weeks prior to Christmas when you have a large number of temporary customer support agents. In either case, you would use the Alternative schedule tab to configure the auto-scale settings for those periods that are outside of normal operations.
-
To create an alternative schedule, select Alternative schedule, and enter the following information:
Note: The Estimated Monthly Costs shown at the top of this page only consider the Default Schedule's settings.
-
Schedule: Toggle this option to Enabled.
-
Days: From the drop-down list, select the off-peak day(s).
-
Dates: Select the specific off-peak date(s).
-
Select + or - to add or remove off-peak dates.
-
-
-
Select the Auto-scale profile (Premium only):
-
From the drop-down list, select the auto-scale profile to use. Alternatively, select Custom to create a custom auto-scale configuration.
Note: For more details, see Manage Auto-scale Profiles.
-
-
-
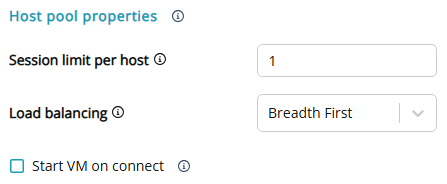
Enter the following Host Pool Properties information:
-
Session limit host: Type the maximum number of sessions per host. Once this session limit is reached, and there are no more available hosts, a new host is started automatically, if it exists.
-
Load Balancing: From the drop-down list, select the desired load balancing.
Note:
-
Breadth First means that the load-balancing algorithm spreads the users evenly across all available session hosts.
-
Depth First means the load-balancing algorithm places all the users in the first session host until the host's session limit is reached. Only then, does it place the users in the next session host. If necessary, it powers on the VM and makes it available to the users.
-
-
Start VM on connect: Select this option to start the session host VMs on connect.
-
-
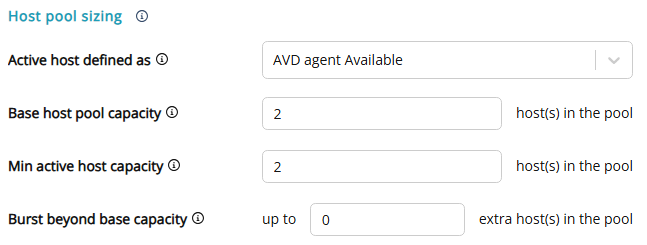
Enter the following Host Pool Sizing information:
-
Active Host Defined As: From the drop-down list, select the active host definition.
Note: When set to “VM started,” the system identifies a session host VM as active as long as the VM is running in Azure. There are very few instances when "VM started" should be selected.
When set to “AVD Agent Available,” the system identifies a session host VM as active only when the AVD back-end is receiving heartbeats and sees the session host as “Available.” In general, you should select "AVD Agent Available.”
-
Base Host Pool Capacity: Type the number of session host VMs to always be part of this host pool. These session hosts may be stopped or running.
-
Min Active Host Capacity: Type the minimum number of running session hosts that are always available. Typically, a session host must be running for users to sign in or the "Start on connect" feature is enabled. Other VMs can be either stopped or turned on, as configured by the user auto-scaling logic.
-
Burst Beyond Base Capacity: Type the capacity to burst above the standard number of session host VMs when there is user demand. The system automatically creates up to this number of new session host VMs above the Base Host Pool Capacity, when needed. These session hosts are the first ones to be removed when the system scales in after business hours.
-
-
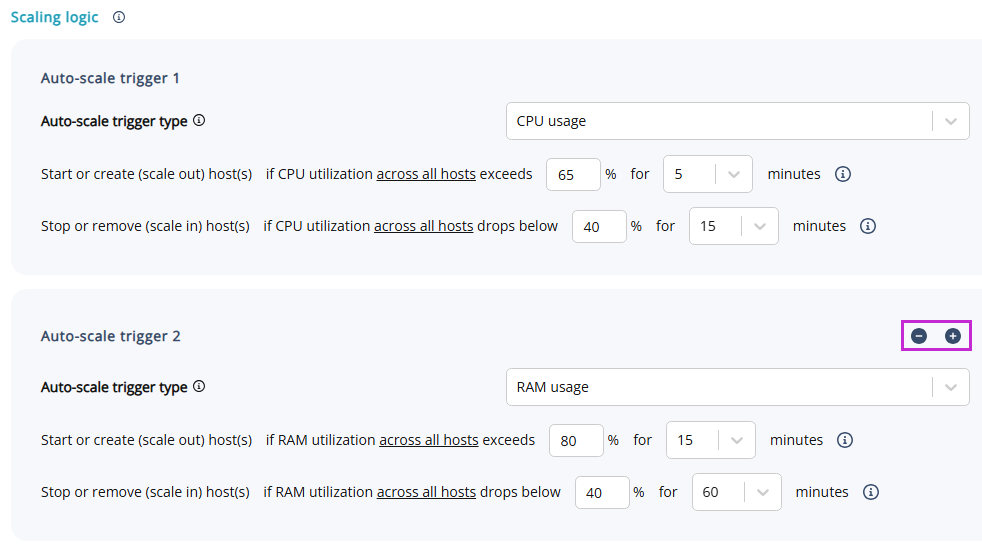
Enter the following Scaling Logic information:
-
Use Multiple Auto-scale Triggers: Select this option to enable multiple usage triggers to be used for scaling out and scaling in. When enabled, you can configure the number of hosts in a group to scale out or scale in.
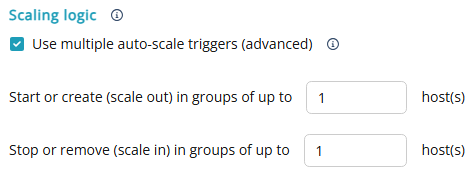
The multiple auto-scale triggers feature is available only in the Nerdio Manager Premium edition.
Notes:
-
Auto-scale adds capacity when any of the scale out conditions are met. Capacity is removed only when all the scale in conditions are met.
-
Use the + and - buttons to add or remove scale out triggers. You may select up to 3 triggers.
-
-
Select Auto-scale Trigger: From the drop-down list, select the auto-scale trigger.
Note: The available triggers are:
-
CPU usage or RAM usage: This scales out when the average CPU or RAM usage across all running session hosts in the pool exceeds a predefined value for a predefined duration.
-
Average active sessions: This scales out when the average number of active sessions per host exceeds a predefined value.
-
Available sessions: This maintains the number of available hosts by scaling out and scaling in within the limits of the Host Pool Sizing and the maximum number of sessions per host.
-
User-driven: Hosts are started when users connect and are automatically stopped after a defined amount of time after all users sign out.
-
-
For CPU usage or RAM usage:
-
Start or Create (Scale Out) Up To: Scale out by starting (if there are stopped VMs) or creating (if there are no stopped VMs) session hosts if the trigger is exceeded.
-
Stop or Remove (Scale In) Up To: Scale in by stopping (if there are no burst VMs) or removing (if there are burst VMs) session hosts if scale in trigger is met.
-
-
For Average active sessions:
-
Start or Create (Scale Out) Up To: Scale out by starting (if there are stopped VMs) or creating (if there are no stopped VMs) session hosts if the average active sessions across all hosts is exceeded.
-
Stop or Remove (Scale In) Up To: Scale in by stopping (if there are no burst VMs) or removing (if there are burst VMs) session hosts if if the average active sessions across all hosts is below the number specified.
-
-
For Available sessions:
-
Maximum sessions per host: Type the maximum sessions per host.
-
Maintain up to X available sessions: Type the number of sessions that must be available either always or during work hours.
Note: This ensures that there are this many available sessions during work hours or at all times. Work hours start at Start of work hours specified in the Pre-Stage Hosts section and end at the beginning of scale in period specified in the Scale in restrictions section below.
-
Outside work hours: Type the number of sessions to maintain outside of work hours.
Note: This value cannot exceed the number of desktops available during work hours.
-
Working hours: From the drop-down lists, select the start and end times for working hours.
-
-
-
For User Driven:
-
When all users log off, scale in hosts after: From the drop-down list, select the number of minutes to scale in after all users have signed out.
Note: Desktops are automatically stopped only when there are no active or disconnected sessions. To automatically sign out disconnected users after a certain time, use the user session limits settings on the host pool properties.
-
-
Scale in Restrictions:
-
Stop or Remove (Scale In) Hosts Only From: From the drop-down list, select the time to perform the scale in operation. Select <any time> to allow scaling in to be performed at any time.
-
Scale In Aggressiveness: From the drop-down list, select the scale in aggressiveness.
Note:
-
High Aggressiveness: Scale in aggressiveness is set to High by default, which means it is guaranteed that after business hours, hosts that have active or disconnected sessions running on them are automatically deleted or powered off to reduce capacity. After business hours, the auto-scale logic first removes the hosts that have no sessions running on them. The remaining hosts are sorted based on the least number of sessions running on them. The users with active sessions are then consolidated and moved to a single host and the other hosts are removed by auto-scale. A warning message is sent to the active session users before removing the session hosts.
-
Medium Aggressiveness: When scale in aggressiveness is set to Medium, after business hours, the scaling logic only removes the hosts that have disconnected sessions running on them. The session hosts with active sessions running on them won't be removed. In this case, the host pool is scaled in to some extent.
-
Low Aggressiveness: When scale in aggressiveness is set to Low, after business hours, the scaling logic only removes those session hosts that have absolutely no sessions running on them. The auto-scale logic does not remove any session host that have sessions, either active or disconnected, running on them. Though this option is less disruptive for the users, there is no guarantee that the host pool is ever scaled in.
-
-
Deactivate (drain mode) hosts: Optionally, you can tell the auto-scale engine to deactivate all hosts at the start of the scale in window. It does leave the minimum number of hosts as specified in the Min active host capacity in the Host Pooling Size section.
-
-
-
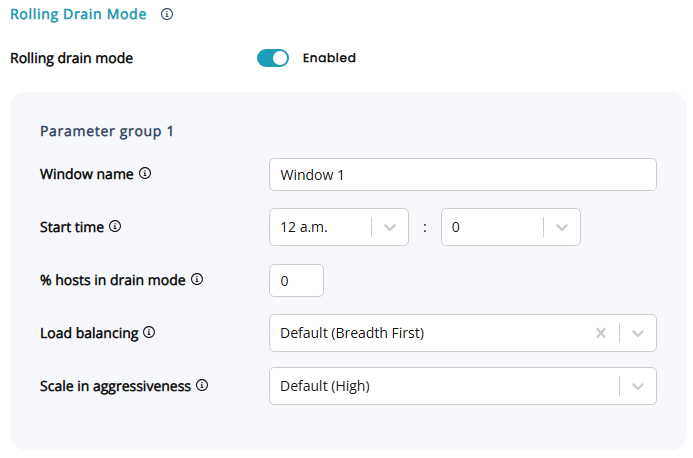
Enter the following Rolling Drain Mode information:
Notes:
-
You can create multiple drain windows and target a specific percentage of your hosts to drain mode, outside of the Scale-in Restriction window. This feature allows you to prevent new connections to a percentage of hosts and allows these hosts to be shut down more quickly, saving on resource costs.
-
Rolling drain mode selects hosts to scale in as follows:
-
First, it starts with lowest active sessions.
-
Then it scales in hosts that are already in drain mode,
-
Finally, it scales in hosts with the lowest number of total sessions (active + disconnected).
-
-
Rolling Drain Mode: Toggle this option to Enabled.to enable rolling drain mode.
-
Window name: Type the name for this drain window.
-
Start time: From the drop-down lists, select the start time when this drain window comes into effect.
Note: The last drain window remains in effect until 11:59 PM.
-
% hosts in drain mode: Type the percentage of hosts in drain mode during this window.
Note: Use
 to add or remove drain windows.
 -
Load balancing: From the drop-down list, select the preferred load balancing algorithm.
Note:
-
Depth First: The load balancing algorithm places users on a single host until the session limit is reached, at which point users start being placed on the next host until the session limit is reached again.
-
Breadth First: The load balancing algorithm spreads users evenly across available session hosts.
-
-
Scale in aggressiveness: From the drop-down list, select the scale in aggressiveness.
-
-
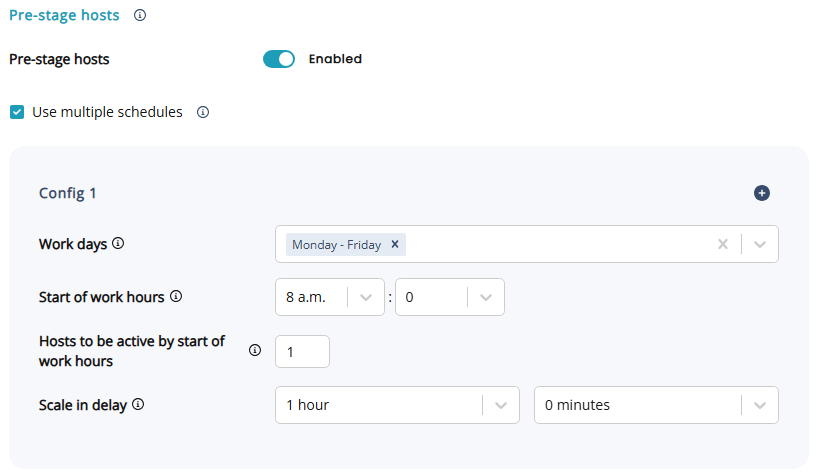
Enter the following Pre-Stage Hosts information:
Note: Configure the system to automatically pre-stage some hosts as available capacity with respect to the business hours. For example, you can pre-stage hosts at the beginning of the work day, so the system does not have to auto-scale in real time for users who all sign in at the same time when they start work.
-
Use Multiple Schedules: Select this option to enable multiple, non-overlapping pre-staging schedules to be used. Use
to add or remove schedules.Note: This is not available for the Available Sessions trigger when During Work Hours option is specified.
-
Work Days: From the drop-down list, select the work days when pre-stage tasks should be run.
-
Start of Work Hours: From the drop-down select the starting hour when pre-stage tasks should be run.
-
Host to be Active by Start of Work Hours: Type the number of session hosts that should be ready to accept user connections by this time.
-
Scale In Delay: From the drop-down list, select a delay to restrict scale in operations after the start of work hours. Pre-staged hosts are not scaled in during this time even if they are unused.
-
-
Enter the following Messaging information:
Note: The system sends messages to any users connected to a session host that has been selected for scale in.
-
Send a Warning Message to Users on the host: From the drop-down list, select the number of minutes before scaling in that the message should be sent.
-
Message content: Enter the warning message text.
-
-
Enter the following Auto-Heal Broken Hosts information:
Note: Session hosts may get impaired due to domain trust issues or FSLogix configuration issues. The AVD agent reports the status of such hosts as unavailable. Admins then have to manually remove such hosts from the pool. However, Nerdio Manager allows you to configure a set of actions to repair these session hosts during the auto-scale process. Auto-scale can automatically attempt to repair "broken" session hosts by restarting and deleting/recreating them. It can make a few attempts to restart the host to try to get it back into an operational state and then either leave it alone or delete and recreate the host.
-
Auto-Heal Broken Hosts: Toggle this option to Enabled to enable auto-heal.
-
AVD agent status: From the drop-down lists, select the desired statuses along with the sessions status.
Note: The status is reported to the AVD service by the AVD agent installed on the session host VM. If something is wrong, the status is something other than "Available." Not every status other than "Available" means that there is a problem. See this Microsoft article for more details. Hosts with active sessions may still be somewhat functional and such hosts are not treated as broken. Only hosts that have either no sessions at all or no active session (that is, disconnected sessions only) are considered broken by auto-scale.
-
First action timeout: Enter the number of minutes to wait before running the first action.
-
Recovery actions: From the drop-down list, select the recovery action(s).
Notes:
-
You may select a VM action (for example, Restart VM or Remove VM), or a scripted action (for example, reinstall SxS, re-register host with AVD, etc.).
-
The recovery actions are run in the order shown. You can drag and drop any action to change its place in the list and, therefore, the order it is run.
-
-
Timeout between recovery actions: Type the number of minutes to wait after each restart attempt before moving on to next step (for example, Restart VM, then Remove VM, then etc.).
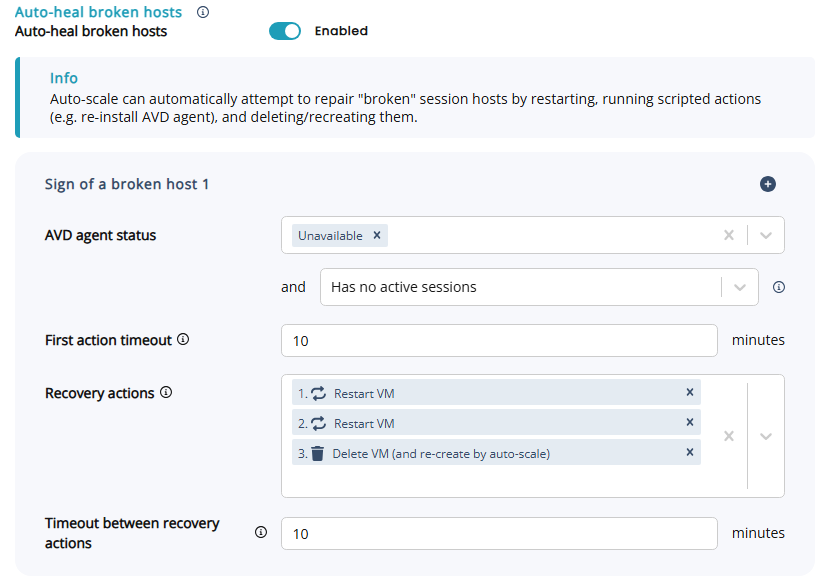
Note: If the Auto-Heal operation requires deletion and re-creation of a broken host VM, a spare VM is powered on to replace the capacity, if available.
-
-
Once you have entered all the desired information, select Save.